Hotline đặt Bánh sinh nhật
Hà Nội: 03.666.22.666Hướng dẫn phủ fondant làm xe ô tô minicooper
Hunnie Cake (Lambanhngon.com) - Dạy làm bánh - Đặt bánh cưới, sinh nhật


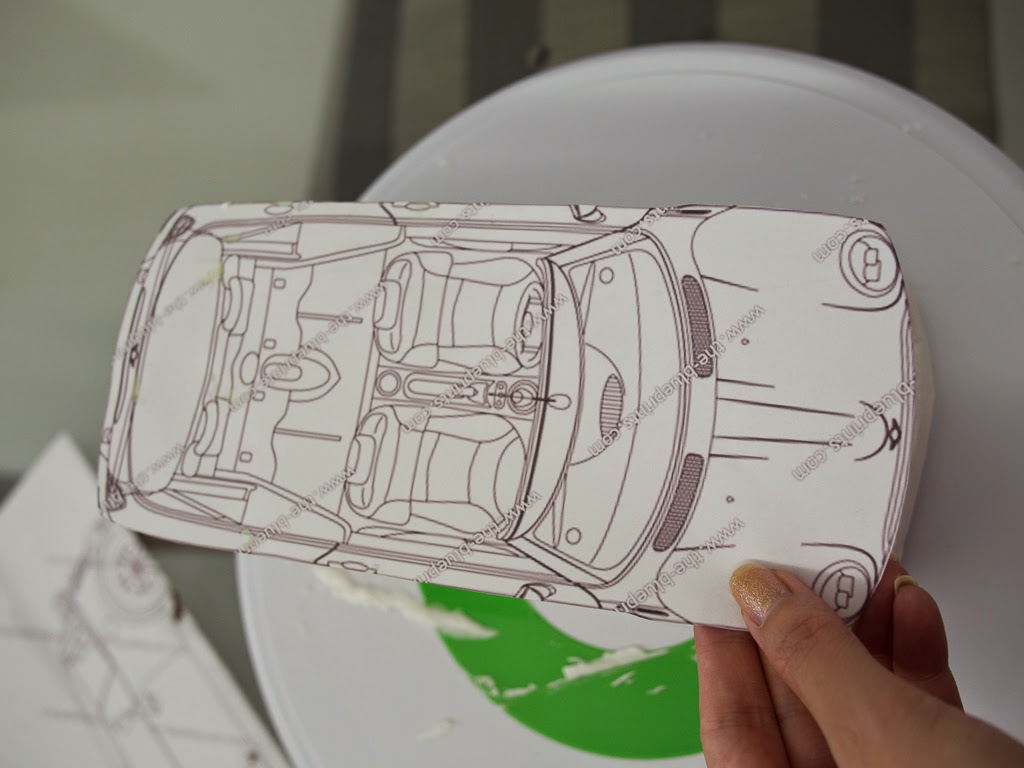
- I started off with some photos of the Minicooper at different angles, front, side, back, you get the picture. Another tool to help you is also the scale model drawings of the car which you can find online. I printed these out to the scale that I wanted to create so that I can get the right shape and now where to position the wheels and doors. Using the template I created the car base using the top view of the scale model. One tip here is to allow room for the wheels which I didn't do and resulted in a lot of tedious reshaping of the wheel in order to try and fit it to appear “underneath” the car rather than stuck to its side.
- I then created the shape of the car using rice Krispy treats, cutting out a well in the middle of the car and creating grooves in the bonnet. Ideally I should also cut out the wells on the side for the wheels but haven't done so here (this is why I call it an experiment, as it was a bit of trial and error)
- The rice krispy model was then covered in royal icing to smoothen out the surface in preparation for the fondant covering.

- Rolling out the fondant to approximately 3mm thick, the fondant was draped over the model and I cut out the well using a scalpel as this section would be covered in black fondant. I did two layers as the video suggested. Outline of the car doors and panels were then imprinted using a blunt modeling tool, with reference to the scale models. With the double layering of fondant, I found that this made the car look neater as when you imprint the edges it prevents the royal icing from showing, as you only imprint on the second fondant layer. You have to work quickly in this step as the fondant starts to dry and crack. I live in Singapore and constantly have the air conditioning on so I'm sure that doesn't help as well! I created imprints using a balling took to create a void for the door handle, and using my smallest circular cutter I created the petrol cap/cover on one side.
- Cutting out wells for the car tyres and then embedded toothpicks to act as wheel spokes.

- I then hand sculpted the wheels using a medium circular cutter and created the alloy rims by using the fondant smoother tool. If you roll out thin strips of fondant with the fondant smoother, you will be able to get more even lengths of rope to use. Placing these in a star shaped pattern on the wheel and then putting a black circular disc in the middle gives the illusion of alloy wheels. I found a metal pencil tin holder which had a criss cross shape which I used to create the wheel tread pattern.

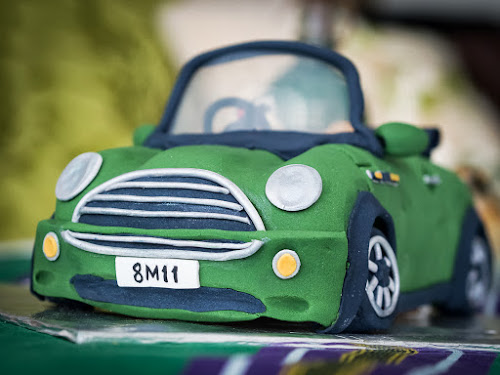
- Now that the general car shape is taking place, onto the fun part of creating the detail which makes all the difference in making a car cake look like….well, a car. I created the door handles, indicator lights, side mirrors, headlamps, rego plates and exhaust using the various fondant modeling tools and stuck these onto the car with a dab of water using my brush. When making these, the trick to it is being patient and constantly referring to the pictures to make them look as realistic as possible.

- To create the windscreen I used a small plastic container to cut out the shape making sure that it is in proportion with the rest of the car. At this stage I referred less to the model as I found that the various layers of fondant has changed it's proportions, however I like how it now looked a bit chubby and somewhat cartoonish. (And yes it's cheating to use plastic and if someone can tell me how to make windshield out of sugar that would be awesome!)
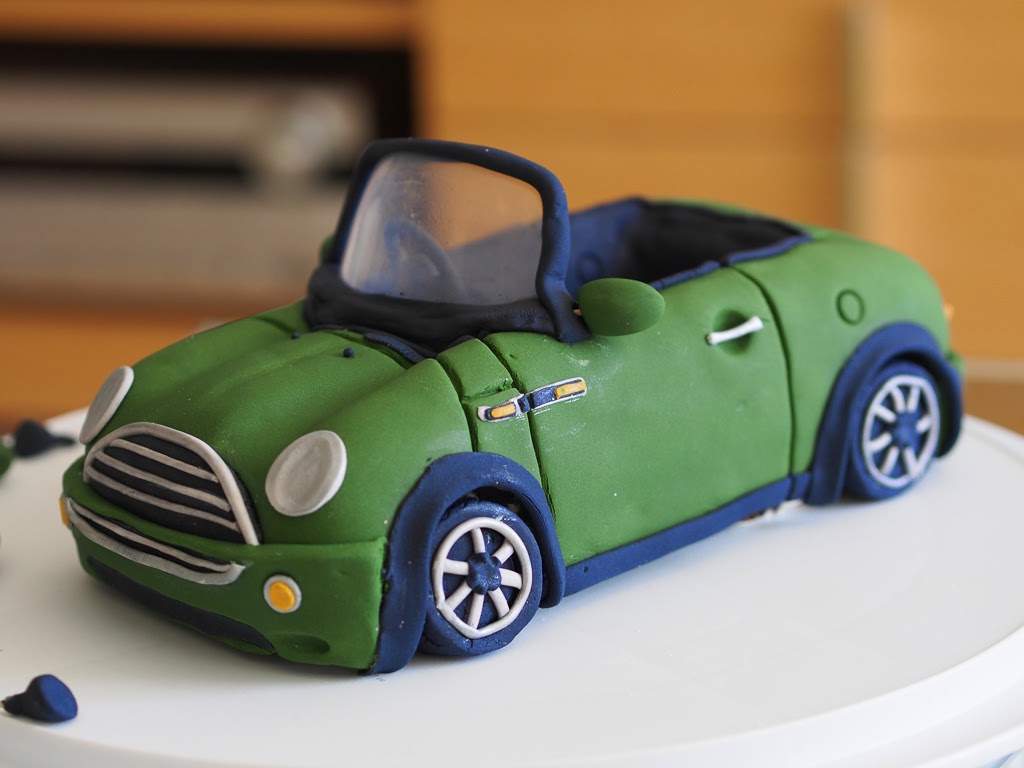
- Modeling with my hands, I created the interior car seats and using the scalloped modeling tool added in detail to give it a slightly retro feel. The steering wheels, seat belts and buckles, gears and speedometer were also hand moulded and painted.
- To make the soft top, I rolled out black fondant thinly, and positioned it over dowel rods to create that rolled up effect and let it dry overnight before attaching this to the back I'd the car. And that's it!!


Các tin cùng chuyên mục
Cách làm hoa theo kiểu RUFFLE FLOWERL đơn giản - 17/08/2014 09:47Hướng dẫn cách làm hoa bánh fondant chủ đề tím trắng - 17/08/2014 09:45
Hướng dẫn cách trang trí bánh fondant nông trại - 17/08/2014 09:42
Hướng cách nặn quần áo, giầy, váy em bé - 17/08/2014 09:40
Cách nặn fondant em bé - 17/08/2014 09:37
Hướng dẫn cách nặn fondant chim cánh cụt - penguin - 17/08/2014 09:35
Cách làm sushi đặt lên bánh - 07/07/2014 17:43
Hướng dẫn cách làm chong chóng đặt lên cupcake - 07/07/2014 17:41
Cách làm hoa hồng david austin - JessicaVu - 07/07/2014 17:37
Cách phủ bánh fondant lâu đài - 07/07/2014 17:34
Các bước làm bánh phủ fondant hộp quà tặng giầy cao gót - 07/07/2014 17:33
Cách làm hoa Peony bằng gumpaste - 02/07/2014 09:33
Những cách trang trí bánh đường dẻo với tông Pastel hoa đẹp - 27/06/2014 08:00
Hướng dẫn trang trí bánh fondant (đường dẻo) chủ để đại dương - 27/06/2014 07:55
Cách trang trí bánh kem phô mai (Cheese cake) ngon ứa nước miếng - 24/06/2014 10:16

Bánh Cupcake Huyền Bí: Đưa Không Khí Halloween Về Bữa Tiệc Của Bạn 11970Giá: 30.000 VNĐ / Chiếc
Bánh Halloween cho bữa tiệc ma quái 11967Giá: 30.000 VNĐ / Chiếc
Bánh Sinh Nhật Con Rồng Vàng: Quà Tặng Hoàn Hảo Cho Bé Trai Tuổi Thìn 11965Giá: 2.010.000 VNĐ
Bánh Sinh nhật rồng vàng oai phong tặng người tuổi thìn 11966Giá: 300.000 VNĐ
Bánh Sinh nhật Labrador siêu ngầu tặng bé trai 11964Giá: 350.000 VNĐ
Dạy làm bánh - Nhận đặt Bánh cưới, Bánh sinh nhật, Bánh Handmade 100% theo yêu cầu - Cung cấp nguyên liệu, dụng cụ làm bánh
Cơ sở 1: Số 65 Ngõ 111 Cù Chính Lan - Thanh Xuân - Hà Nội (Đến số 311 Trường Chinh - Ngã tư sở đi vào) (Xem bản đồ)
Cơ sở 2: Số 10A Tràng An - phường Tân Thành - Thành phố Ninh Bình. ( Đối diện hồ Kỳ Lân) ( Xem bản đồ)
Điện thoại : 03.666.22.666 (Viber/Zalo) - 08.5622.5622 - 0983.002.989 (WhatsApp)
Số TK: 10524948099011 - Chủ TK: Mai Thu Trang - Ngân Hàng: Techcombank - Hà Nội.
Số TK: 0021001040845 - Chủ TK: Mai Thu Trang - Ngân Hàng: Vietcombank - Hà Nội .
Email: hunniecakehn@gmail.com
--------------------------
|
Cửa hàng bánh Hunnie Cake |